A complete declarative solution that allows you to take action on multiple selected records using Salesforce Flows. This solution can be used on any object, whether custom or standard, and supports a variety of different actions – like mass deleting records, updating multiple records, and more.
Let’s create a list flow (in a form of a button), which will enable us to change the status of multiple Delivery Notes at once.
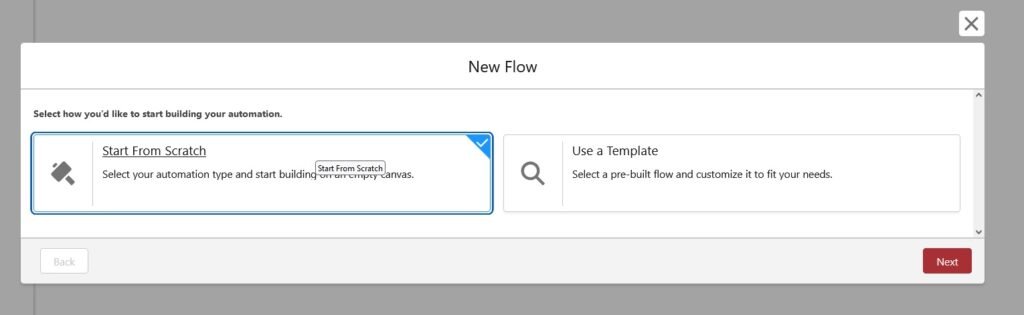
The first step is to access our Flow Builder and create a new flow from scratch. Next, let’s choose a Screen Flow, as we’ll need a user interface to take action on the records we want to update, then click Create.
Since we are performing a change on multiple records, we need something to store the IDs of these records. What’s better than a variable called, well, ids – this name has to be exactly like this; it’s an undocumented feature in Salesforce, but it works. In your Flow toolbox, click on the New Resource button, set Resource Type as Variable, name it ids, and check the box under Allow multiple values – quite self-explanatory if we consider that we want to collect multiple records.

This variable will store multiple IDs of our records, but what about other fields, especially the ones we want to change? We need a variable that will store a single Delivery Note record and another for a collection of these records. Let’s create these by using our Toolbox, as shown in the below images. This time, our Data Type will be a Record – these also need to be available for input.


Let’s now create a screen that will allow us to change the status of our Delivery Notes.
I’m naming my screen and adding an API of my choice. I’m also adding a picklist choice set from the Delivery Note object and connecting this screen to a Start element.
The next step is very crucial if we want to avoid the most common error in this method – switch from auto-layout to free-form layout when constructing your flow. This is because the next thing we’re going to do is create a Loop, which often goes in the wrong direction when dealing with multiple assignments. This can cause errors, such as being unable to handle a single record or always missing one record in the collection.

Let’s create the Loop. All we need is to drag the element onto our canvas, name it appropriately, and select ids as our collection variable. Then connect it to your screen element.

The next step is to assign values to a single Delivery Note record. Let’s drag an Assignment element onto our canvas. I’m naming it “Set Delivery Note Fields” and setting the variable values as follows:
SingleDeliveryNote – RecordID= Current Item from our LoopSingleDeliveryNote – Status= Data from our screen (Delivery Note Status)

We’ve set the values for a single Delivery Note. Now we need to do the same for all selected records, which means we need to assign this single Delivery Note to the collection and loop through it again to get the next item ID from the Loop. Let’s drag another Assignment element to the canvas. This time, we’ll just add a single item to our collection variable created at the beginning. Set the variable values as below.

Connect the elements, ensuring the Loop is connected to the single record assignment first, then the single record to the collection, and finally, connect the collection assignment back to the Loop. Now we can create a Data Element, in our case, an Update Record element, to update all the records in the collection. Our flow is now ready. We can also create a fault path, but let’s leave it for later. Save and activate the flow. Now we need a Flow URL for our button, which typically is /flow/flow_api. In my case, the URL is /flow/Update_Delivery_Notes.

Now I’m going to Object Manager in Setup and selecting my Delivery Note custom object. Then I navigate to Buttons, Links, and Actions and choose New Button or Link. Name it as you like – in my case, it’s “Change Status” – and choose the List Button option. Make sure the Display Checkboxes option is ticked. Paste your Flow URL into the formula box and save the button. All you need to do now is navigate to List View Button Layout, select your new button, save it, and it’s ready to use!


If you’d like to be redirected back to your list view, just add a retURL function at the end of your Flow button link, as shown below. This will redirect the user to any URL you specify – in my case, to a Delivery Note list view.

If you’d like us to create solutions like this or similar ones, please don’t hesitate to contact us for a free quote by clicking the button below.