Salesforce is a powerful tool for managing your customer relationships, and one of its core features is the ability to create and manage Contacts. Contacts represent the people you do business with, and keeping them organised is key to building strong relationships. In this guide, we’ll walk you through how to create, import, and manage Contacts in Salesforce.
1. Understanding Contacts in Salesforce
Before diving in, it’s important to understand what a Contact is in Salesforce. A Contact is an individual person associated with an Account (e.g., a company or organisation). For example, if you’re working with a company called “ABC Ltd,” the people you interact with at ABC Ltd would be saved as Contacts.

Contacts are different from Leads (potential customers) and Accounts (companies or organisations). Think of Contacts as the people you communicate with, while Accounts are the businesses they belong to.
2. Adding a New Contact Manually
To create a new Contact in Salesforce, follow these steps:
- Log in to Salesforce: Open Salesforce and log in with your credentials.
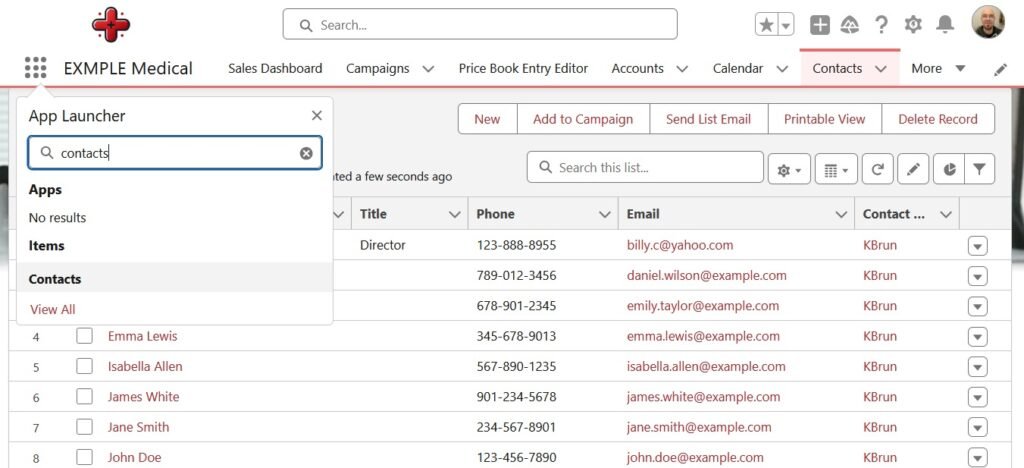
- Navigate to the Contacts Tab: Click on the App Launcher (the grid icon in the top-left corner) and search for “Contacts.” Select the Contacts tab.
- Click “New”: On the Contacts page, click the New button.
- Fill in the Contact Details:
- Enter the Contact’s First Name and Last Name.
- Link the Contact to an Account by searching for the Account name in the dropdown.
- Add other details like Email, Phone Number, and Job Title.
- Save the Contact: Once you’ve filled in the details, click Save.
Congratulations! You’ve just created your first Contact in Salesforce.
3. Importing Contacts Using the Data Import Wizard
If you have a list of Contacts in a spreadsheet (e.g., a CSV file), you can import them into Salesforce using the Data Import Wizard. Here’s how:
- Prepare Your CSV File: Ensure your spreadsheet has columns like First Name, Last Name, Email, and Account Name. Save it as a CSV file.
- Go to the Data Import Wizard: In Salesforce, go to Setup and search for “Data Import Wizard.” Select it.
- Choose the Object to Import: Select Contacts and Accounts and click Next.
- Upload Your CSV File: Click Choose File and upload your CSV file.
- Map the Fields: Salesforce will ask you to match the columns in your file to the fields in Salesforce (e.g., map “First Name” to “First Name”).
- Review and Import: Check the data for errors, then click Import.
Once the import is complete, your Contacts will appear in Salesforce.
4. Organising Contacts with List Views
To keep your Contacts organised, Salesforce allows you to create List Views. Here’s how:
Create a List View:
- Go to the Contacts tab.
- Click on the gear cog icon and select New.
- Name your View (e.g., “Craddle Account contacts”).
- Set filters (e.g., Account Name contains: Craddle).
- Save the View.
Use Filters and Search:
- Use the search bar at the top of the Contacts page to find specific Contacts.
- Apply filters to narrow down your list (e.g., filter by Account or Job Title).
5. Managing and Updating Contacts
Over time, you may need to update or manage your Contacts. Here’s how:
Edit a Contact:
- Go to the Contacts tab and find the Contact you want to edit.
- Click on the Contact’s name to open their record.
- Click Edit and update the details as needed.
- Click Save.
Delete a Contact:
- Find the Contact you want to delete.
- Click the dropdown next to their name and select Delete.
- Confirm the deletion.
Track Activities:
- Use the Activity section on a Contact’s record to log calls, emails, and meetings.
- This helps you keep track of all interactions with the Contact.
Tips for Effective Contact Management
- Keep Data Clean: Regularly review and update your Contacts to ensure the information is accurate.
- Use Tags and Notes: Add notes or tags to Contacts to provide context for future interactions.
- Leverage Automation: Use Salesforce tools like Flow to automate tasks, such as sending follow-up emails when a Contact is created.
Creating and managing Contacts in Salesforce is a straightforward process that can greatly improve your customer relationship management. Whether you’re adding Contacts manually, importing them in bulk, or organising them with List Views, Salesforce provides the tools you need to stay on top of your relationships.
If you’re looking for assistance with setting up or optimising your Salesforce instance, IntegraLogic is here to help.